One-time setup. Complete these steps once to get your Jump Trackers ready.
Step 1: Connect your Jump Tracker to your device
Your sensors need to be connected to a device that has an internet connection via a hotspot. (for example, your phone)
Sensors remember up to 5 device hotspot and reconnect automatically.
Step 2: Setup your aiving account
Who are you?
Default is Skater. You can switch to Coach anytime.
1. Connect to the Aiving app
Pro tip: Bookmark the Aiving app and add it to your Home Screen.
2. Add your Jump Tracker to your account
- Open Aiving -> Jump Trackers and + Add new Jump Tracker.
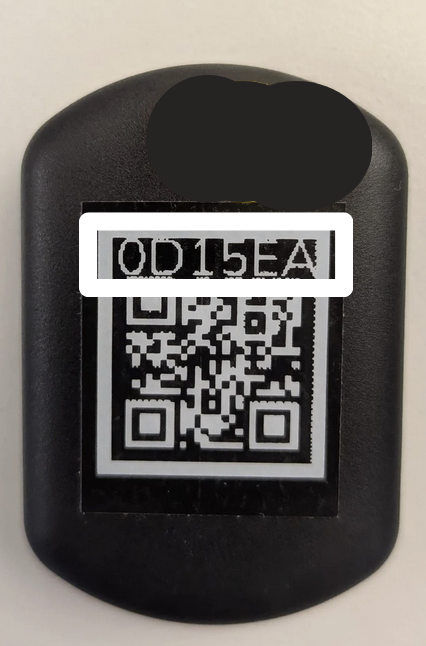
- Enter the right and left sensor IDs from the back of each sensor.
- Give your Jump Tracker a nickname.
Sensor ID location:
3. Invite skaters
- Open Aiving -> athlete page.
- To invite skaters, you have multiple options:
- Click Add skater and enter the skater's email. Existing users receive a request; new users receive an invitation to create an account.
- Click the invite link and share the QR code or email with the skaters.
Pro tip: You can also add a skater directly at the rink before starting a session.
3. Confirm your access4. Confirm your access
Make sure your subscription is liked to your account before your first session.
- Open Aiving -> Profile picture → Subscriptions.
- Under Manage my subscriptions, confirm you see your Jump Tracker plan.
- Check the assigned account — the skater slot should show the correct person (you, or the skater you want).
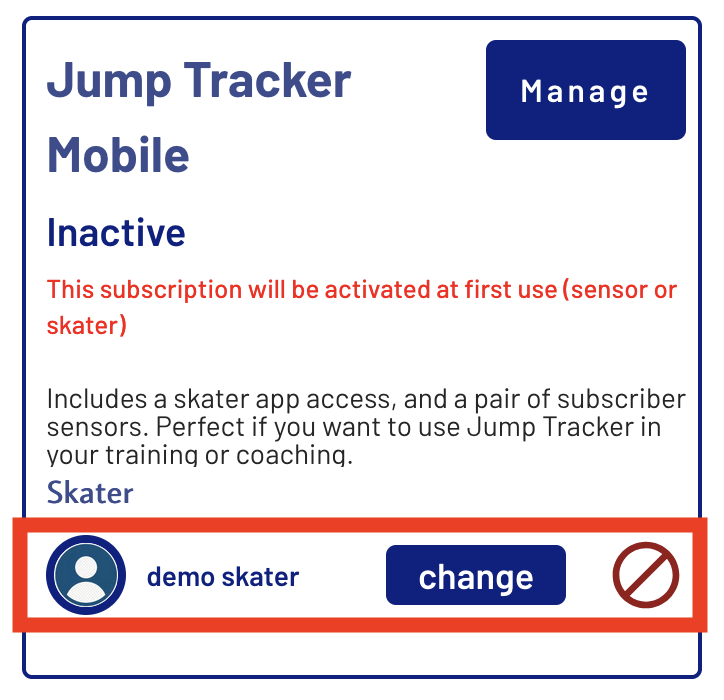
- When you are done, the skater should see Skater App Access in my subscription
I bought the subscription but don't see it
Check your order confirmation email — it contains a link to add the subscription to your Aiving account.
Still stuck? Contact us: WhatsApp or support@aiving.ch.
Step 1: Get to know the sensors and straps
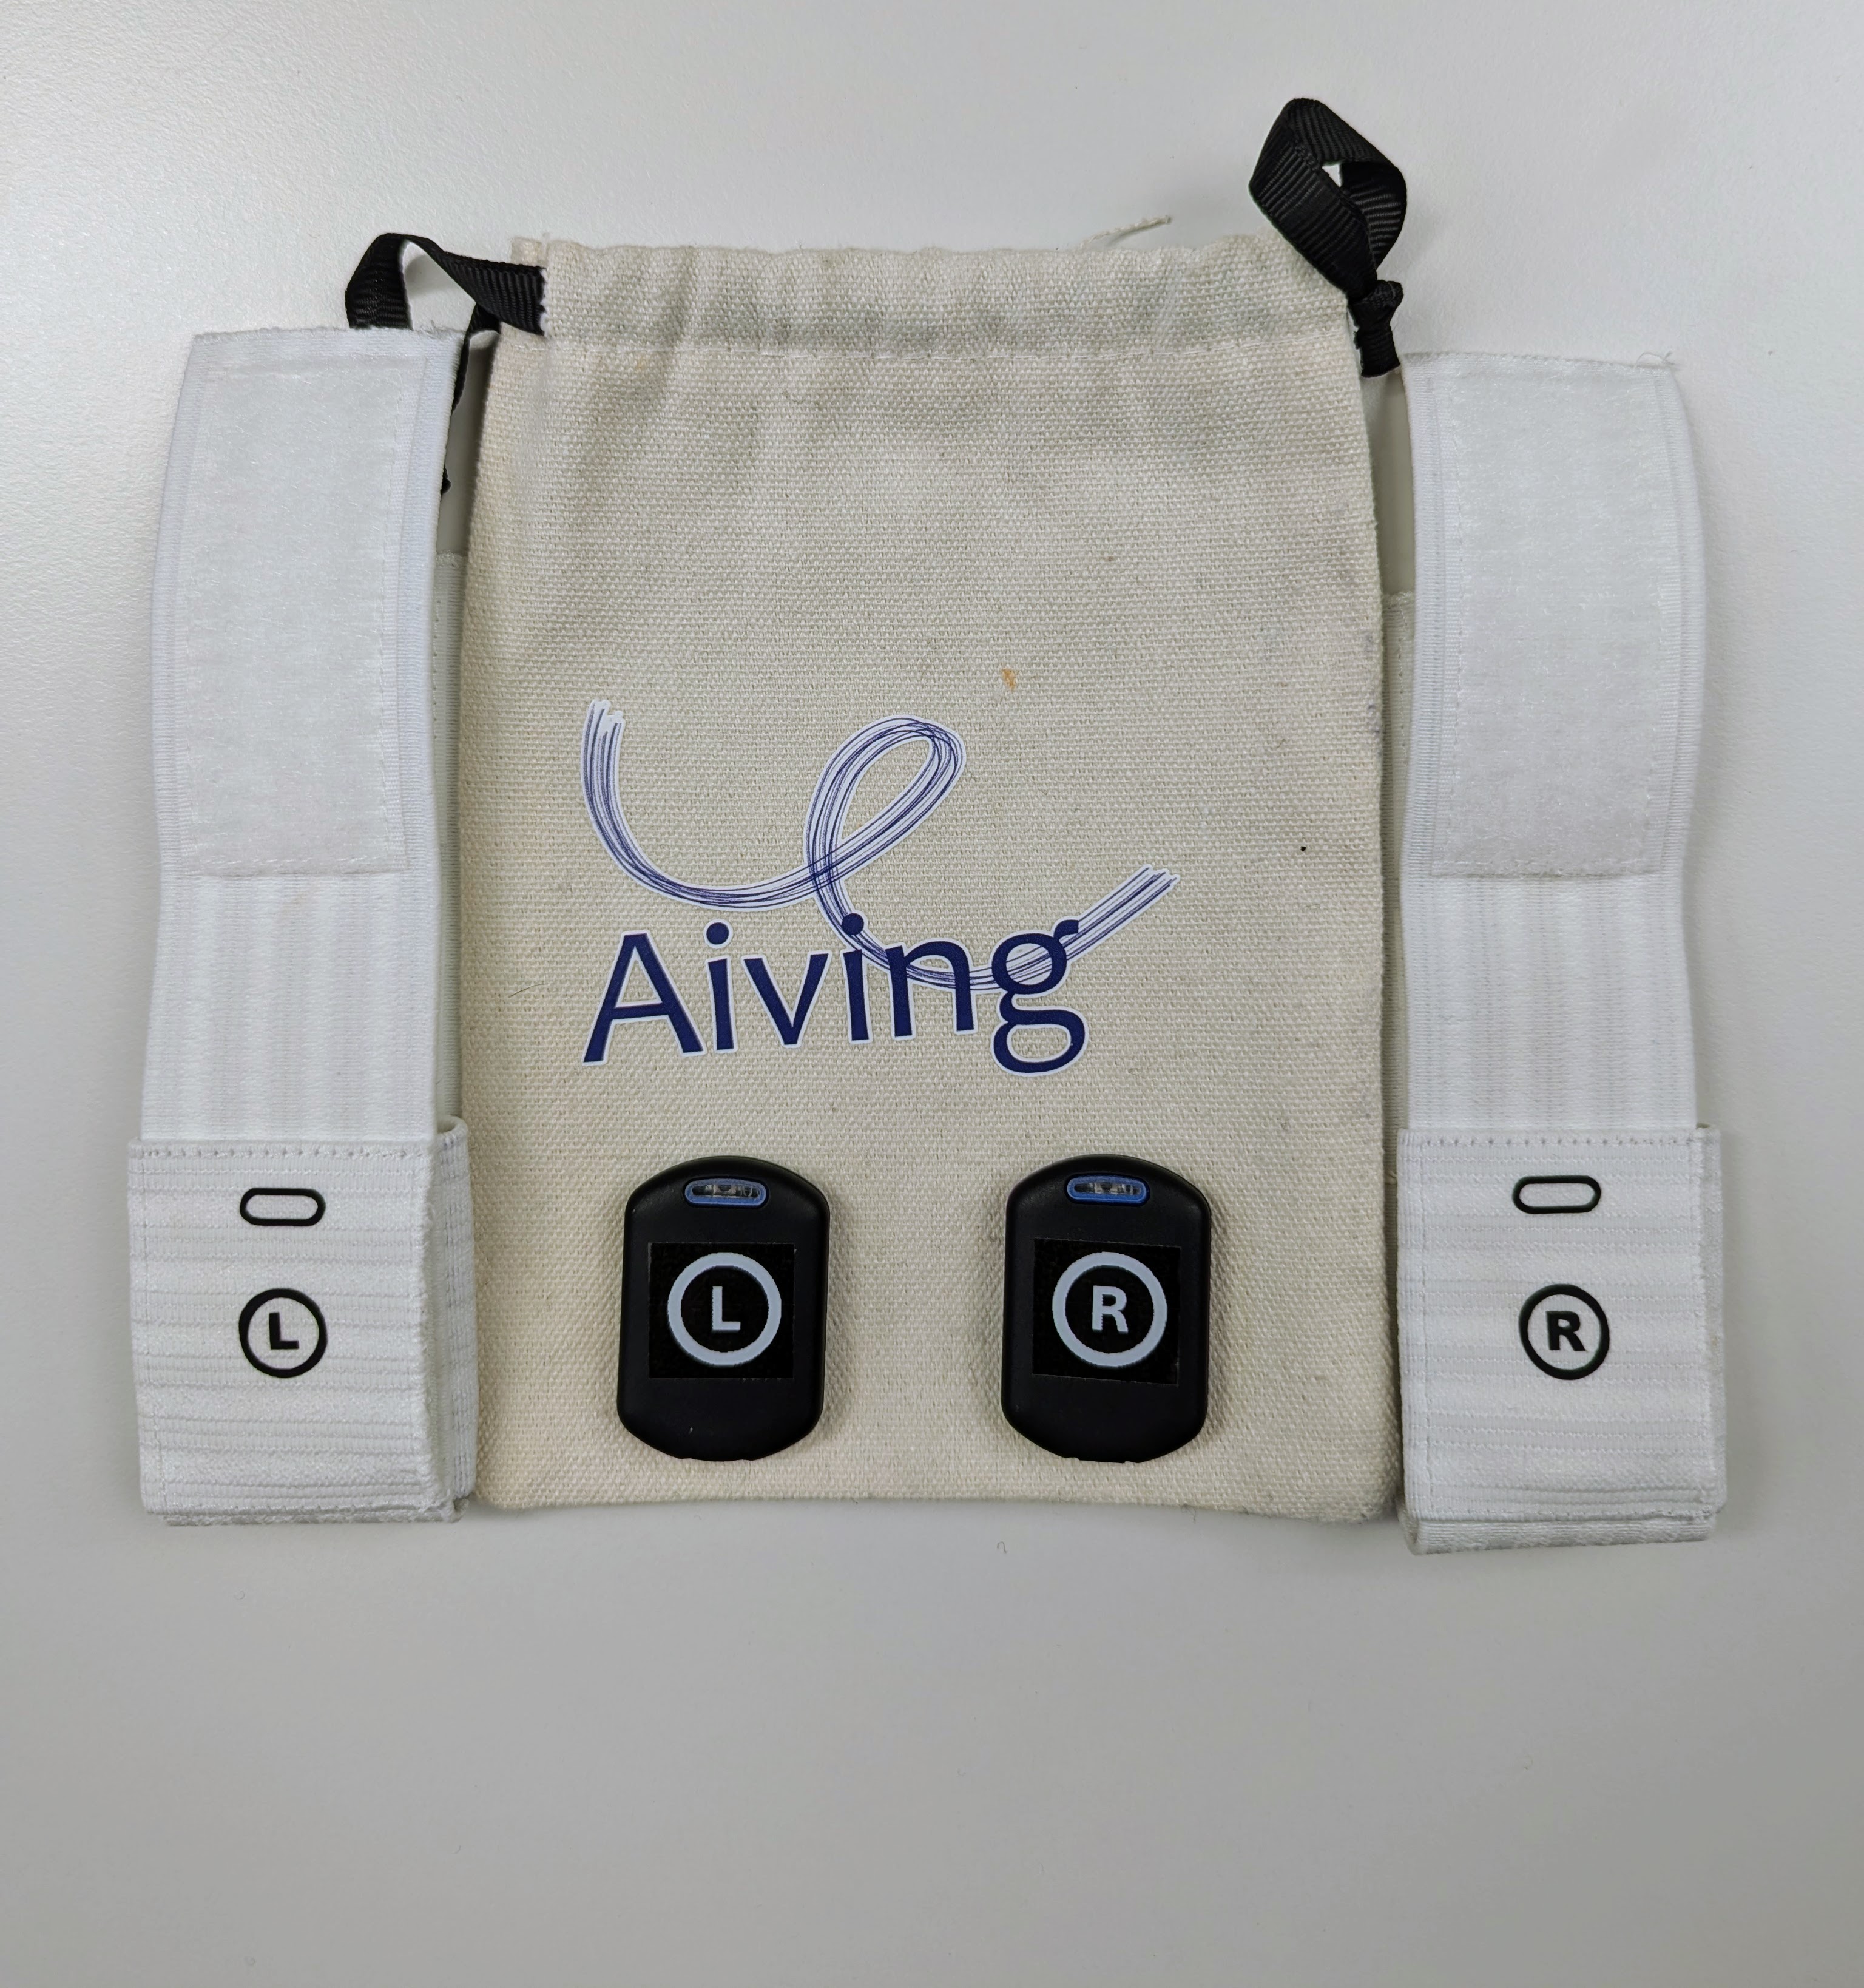
1. What's in the pouch?
The sensors are inside the straps: remember how they were placed
It is important to place the sensors correctly in the straps.
2. Turning the sensors on/off
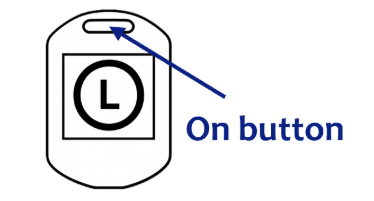
To turn on: press and hold the power button until the light turns on (white or slightly pink). ●
To turn off: press and hold the power button until the light blinks pink, then stops. ●
3. Check battery level
When the sensors are on, press the power button once and count the number of blue light blinks: it indicates the battery level.
● 1 = 0-25%● 2 = 25-50%● 3 = 50-75%● 4 = 75-100%
Red blinking indicates low battery ●
4. Charge your sensors
- Plug your sensors using the provided charger (USB-C).
- Turn sensors on.
- ● Blue light blinking - charging
- ● Blue light solid - fully charged, plugged in
- ● Other color - not plugged in
- 💡 Turn sensors off to charge faster.
Charging time: 5 hours from empty to full
Battery life: about 1 hour on ice.
5. Wear Jump Tracker on the ice
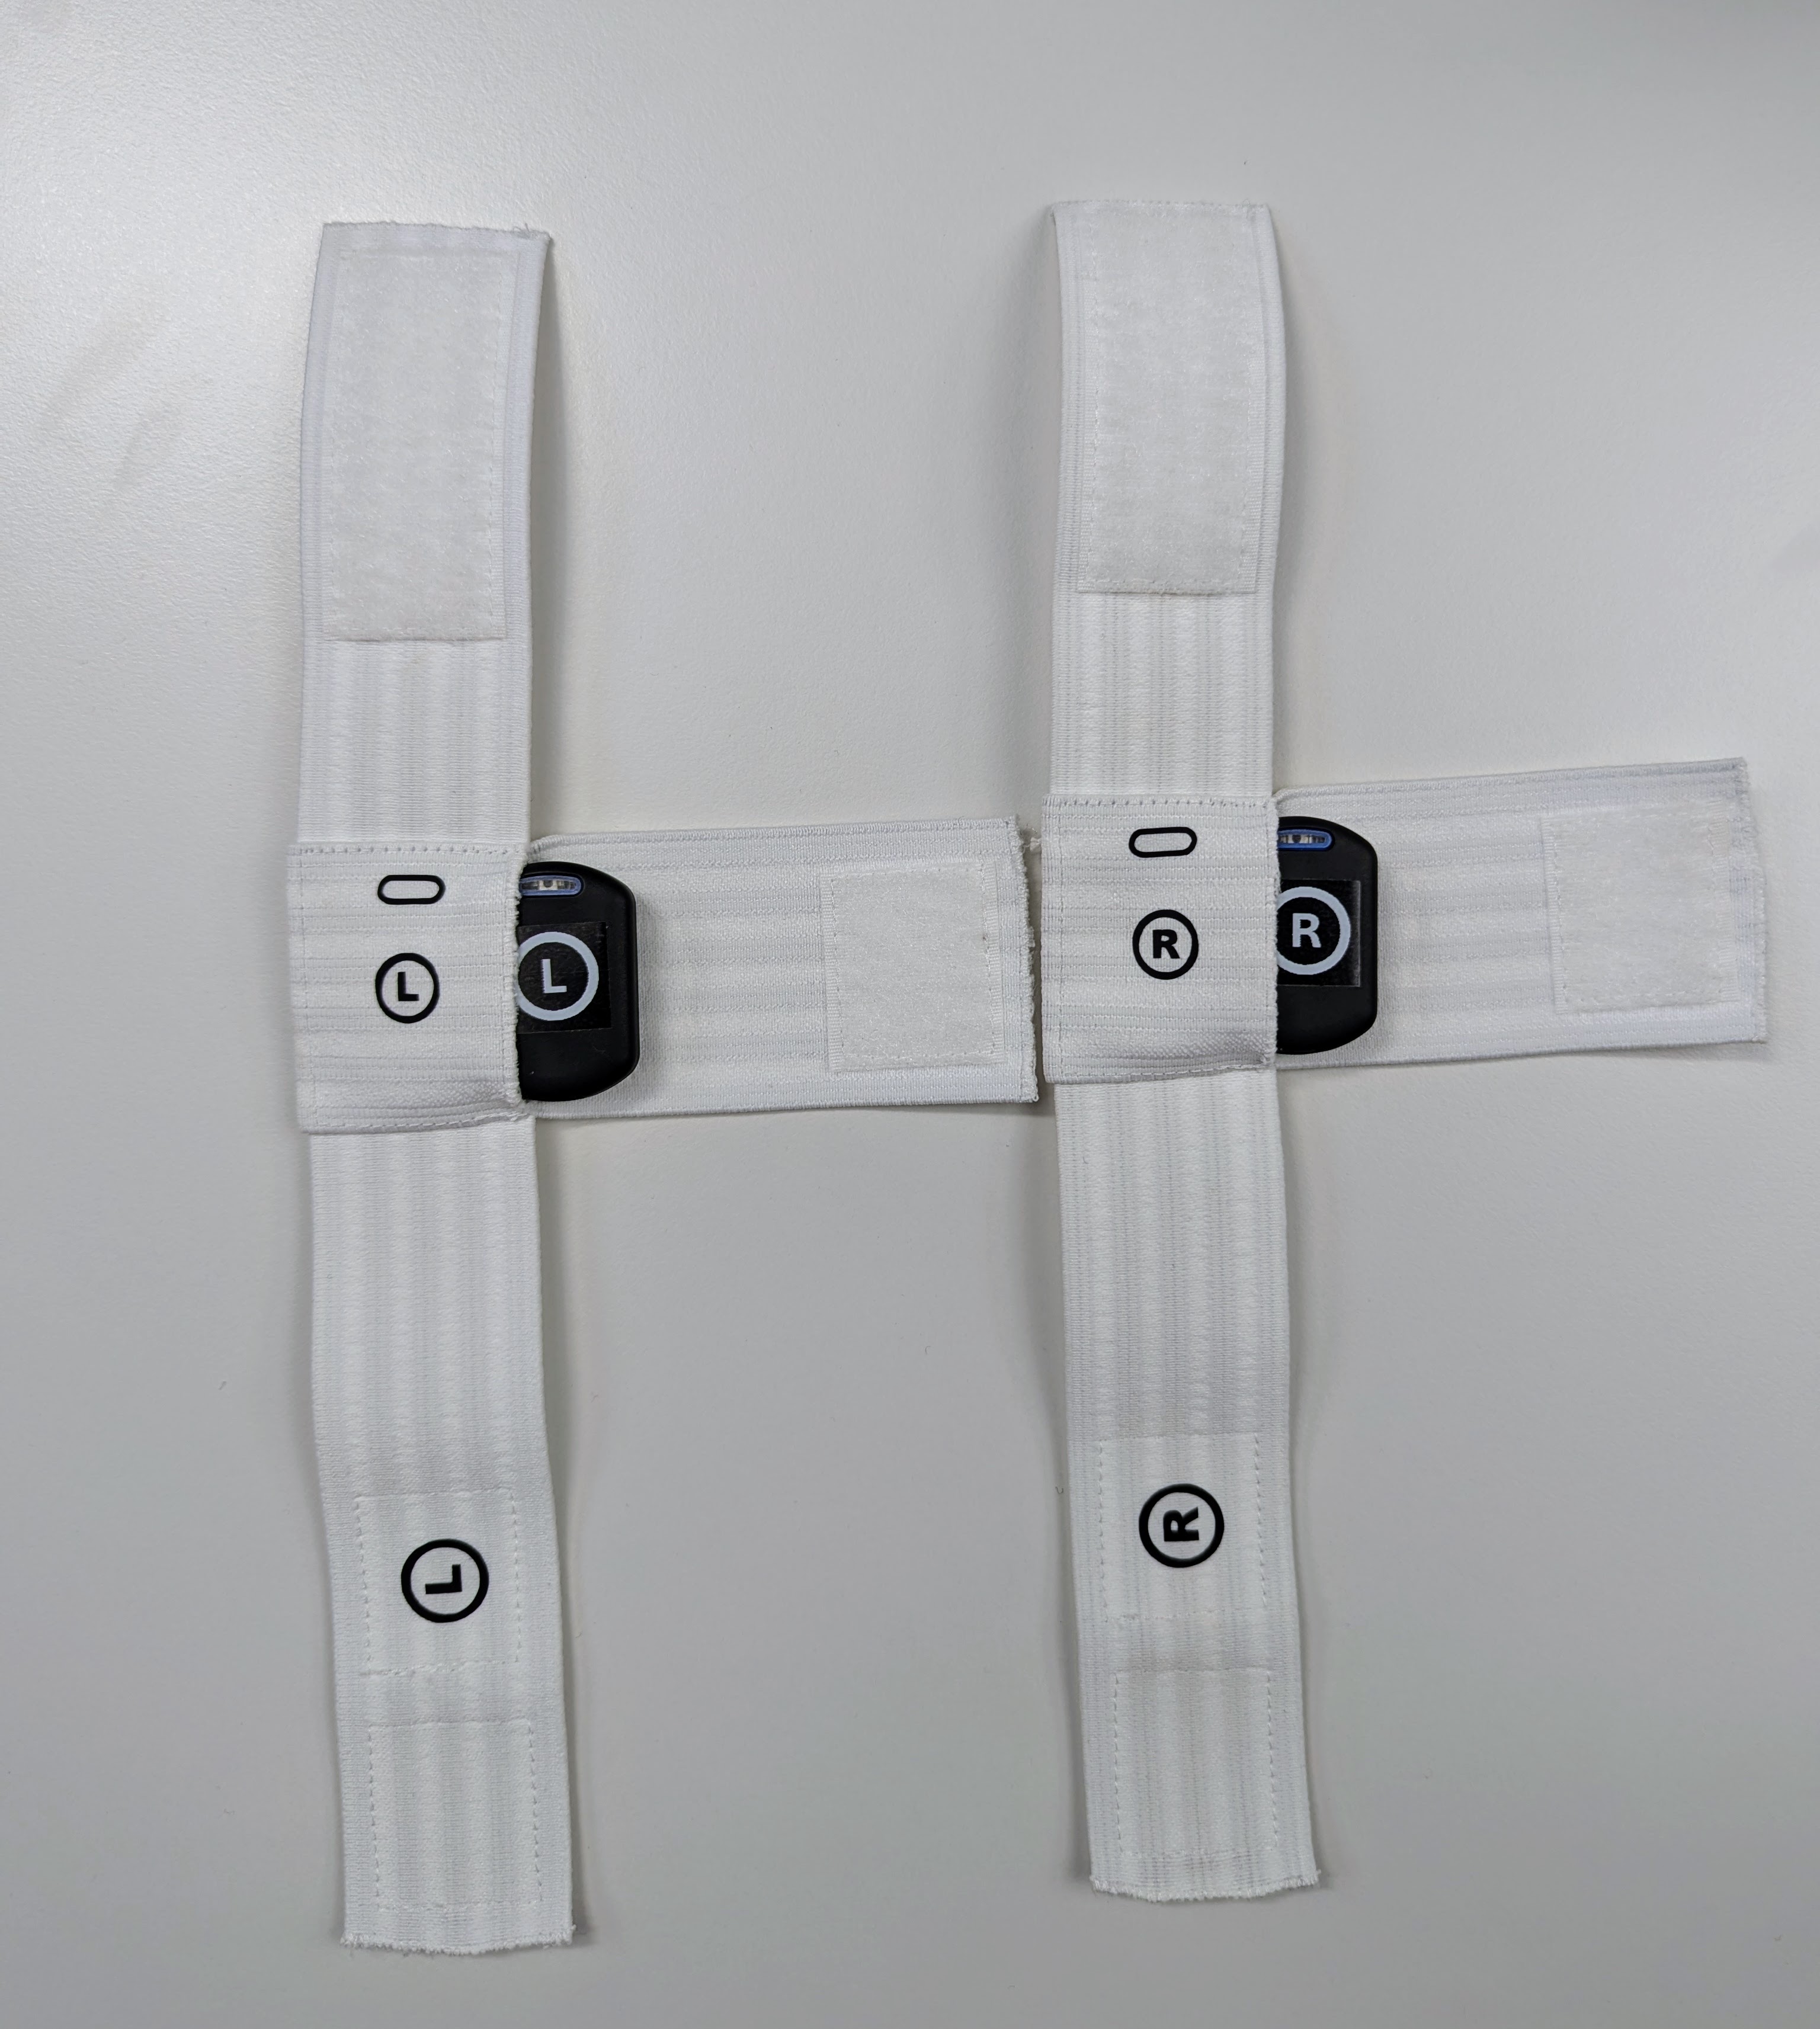
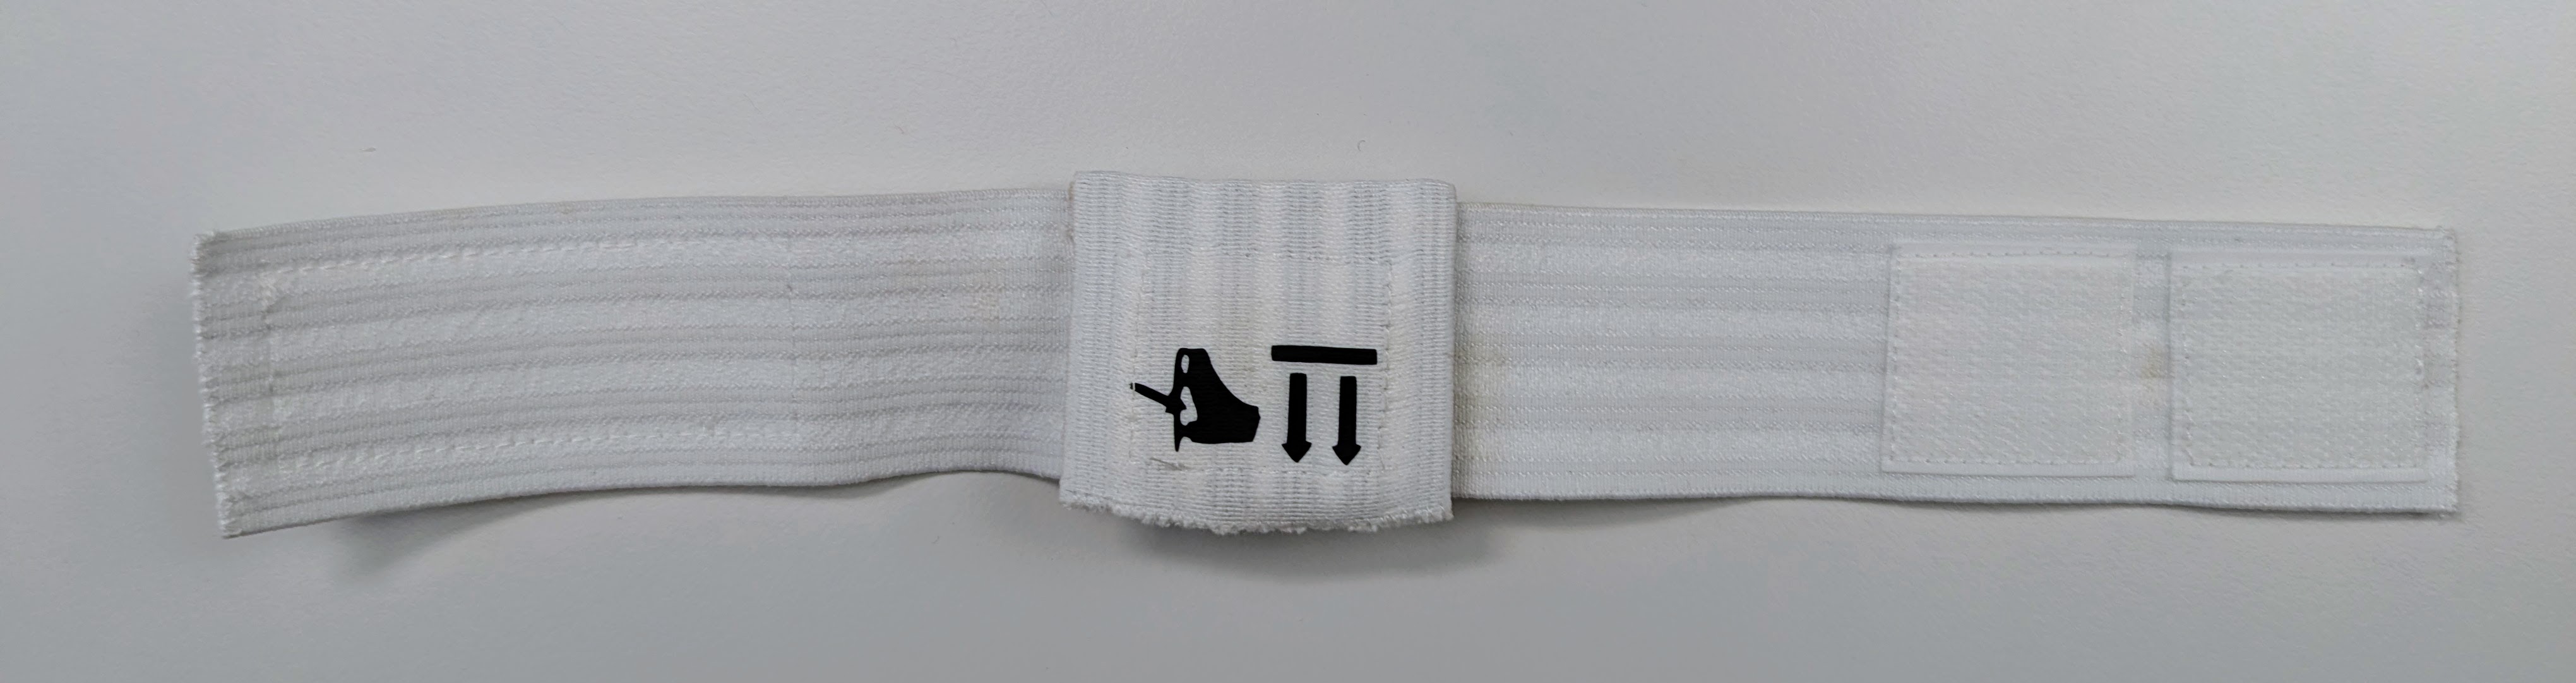
1. Place the sensors in the straps
- Place Right sensor in the Right strap aligning the button with the button slot (see image below)
- Repeat with Left sensor in Left strap
- You should see the sensor light shine through the button mark on your strap (if your strap is white)
- Close the straps and ensure sensors are securely in place.
2. Attach the straps to the skates
- The sensors go under the skates.
- The two arrows point toward you when attaching the straps to the skates.
- Straps are correctly placed if L and R are as shown on the image.
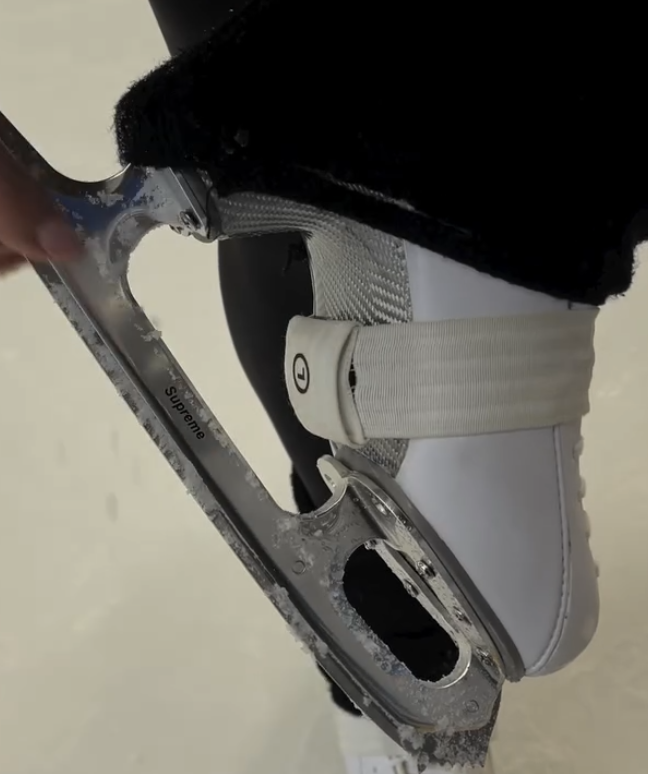
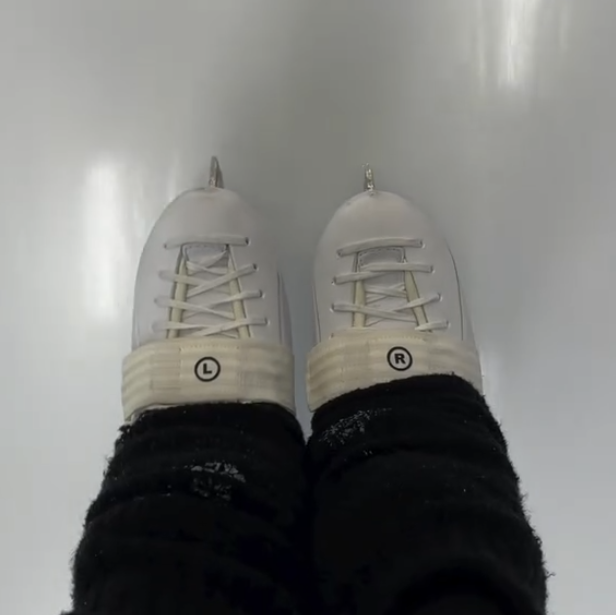
💡 If the sensors are wrongly placed, the jump call may be wrong.
Step 2: Use Jump Tracker
Who are you?
Default is Skater. You can switch to Coach anytime.
Use this routine every time you skate with Jump Tracker.
Before the ice: fully charge your sensors (overnight is recommended).
Prep
- 📱 Turn on your mobile hotspot (compatibility mode).
- ⛄️ Turn on both sensors, place them in the straps, attach straps to your skates. ● Light should be green and blinking. Placement guide
- In the Aiving app, start a session by clicking Play in the bottom bar. Select your sensors. Make sure it says "Online". Not online?
Skate
- Keep the hotspot phone rinkside.
- 🎉 Jump! See your jumps and data appear on screen in real time.
- 🛑 When you're done, turn off the sensors and end the session.
- 🔌 Recharge sensors for your next session.
Prep — before the ice
- 📱 Turn on your mobile hotspot (compatibility mode).
- ⛄️ Turn on sensors, put them in the straps. ● Light should be green and blinking. Placement guide
- In the coach dashboard, toggle your sensors on. Should show "Online" status. Not online?
Skate
- Keep the hotspot phone rinkside.
- Select the skater from the dropdown and click Confirm. New skater? Add them with the +👤 button.
- Have the skater wear the straps. Placement guide
- 🎉 Watch jumps appear live in the coach dashboard! Click a skater's data for a detailed view.
- 🛑 Done? Switch to the next skater, or turn off sensors. Turn off physically + from the app toggle.
- 🔌 Recharge sensors for the next session.
Pro tip: You can run sessions for multiple skaters at the same time.
Use the app
Find common in-app actions for setup and daily usage.
Add a jump tracker to your account
Sensor ID location:
- In the Aiving app, click Jump Trackers and + Add new Jump Tracker.
- Enter the right and left sensor IDs from the back of each sensor.
- Give your Jump Tracker a nickname.
Review your data (skater)
- Progress gives an overview of your performance.
- Open Sessions, then select a session for details.
Review your skater's data (coach)
- Go to the athlete page and choose a skater.
- Progress shows performance trends.
- Sessions shows all sessions; select one for details.
Invite a skater
- In the Aiving app, go to the athlete page.
- To invite skaters, you have multiple options:
- Click Add skater and enter the skater email. Existing users receive a request; new users receive an invitation to create an account.
- Click the invite link and share the QR code or email with the skaters.
Pro tip: You can also add a skater directly at the rink before starting a session.
Problem with jump detection
A jump was detected but I did not jump
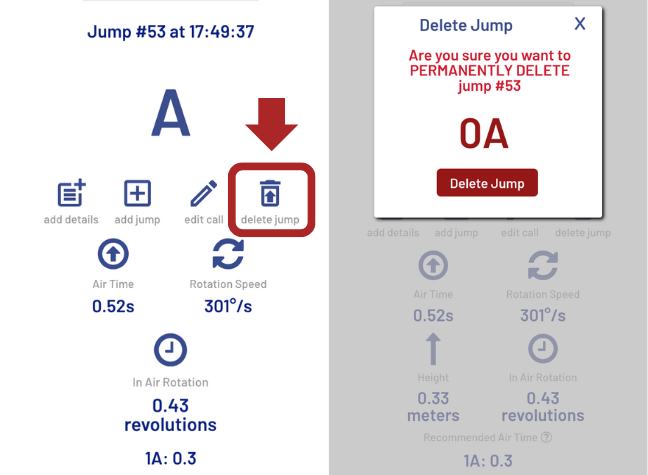
Jump Tracker is very accurate at detecting jumps. Sometimes it can still mistake another movement for a jump. If you do not want this movement in your data, you can delete it in the app.
If Jump Tracker is making a lot of mistakes, check these issues:
I keep seeing A or 1Lo between jumps
Hops and half-jump drills can look like real jumps. If you do not want them in your data, remove them with Delete.
My jump was not detected
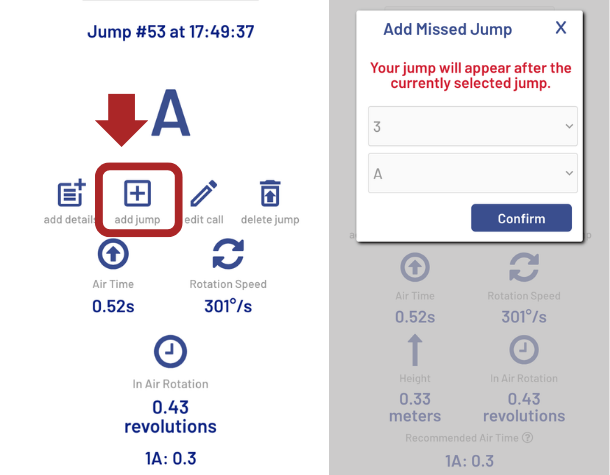
Jump Tracker is very accurate at detecting jumps, but sometimes it can still miss one. You can add a jump to your session using the Add Jump button.
- Confirm sensors are Online during the session.

Jump Tracker is currently optimized for detecting double, triple, and quadruple jumps. We are working on a better version for single-jump detection.
The wrong jump got detected
Jump Tracker has around 91% accuracy on jump classification, but sometimes it makes mistakes. You can edit the call through the app.
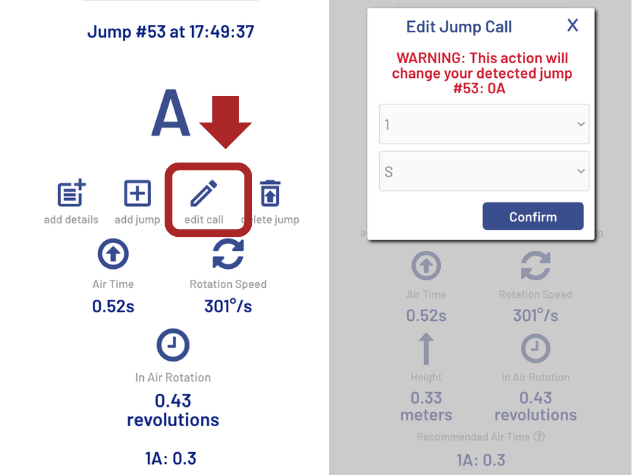
Note: Rotation speed, air time, and in-air rotation remain accurate even if the jump label is wrong.
If Jump Tracker is making a lot of mistakes, check these issues:
My triple was detected as a double
Jump Tracker classifies from in-air rotation. If pre-rotation is high and rotation is unfinished at landing, a triple attempt can be classified as a double. This is useful feedback: improve in-air rotation and the call should move to triple.
1A detected as 2Eu
This is usually caused by sensor orientation/placement. Check that R is on right foot and L on left foot, both right-side up and visible. Also verify each sensor is in the correct strap with the sensor light visible through the oval window.
Salchow detected as Axel
If your Salchow keeps getting detected as an Axel, move the sensor slightly toward the outside of the boot. This helps Jump Tracker better read your take-off pattern.
Axel detected as Salchow
If your Axel keeps getting detected as a Salchow, move the sensor slightly toward the inside of the boot. This helps Jump Tracker better distinguish the take-off direction.
My jumps are detected as NLJ
NLJ means "non-listed jump" and is used for jumps that Jump Tracker is not able to classify. If it happens a lot, it is generally caused by the left and right sensors being on the wrong side. Check that R is on the right foot and L is on the left foot, both right-side up and visible. Also verify each sensor is in the correct strap, with the sensor light visible through the oval window.
Managing subscriptions
Assign a subscription to a skater
- Log in to the Aiving account that purchased the subscription
- Go to the Subscriptions page (click your profile icon, then subscriptions)
- In your subscription, assign the skater (including yourself)
Manage your subscription
You can check your subscription status at the top of the subscription block (Active, Inactive, Paused, etc.). Use the Manage button to update billing information or cancel your subscription.
Your subscription starts only after first use and after the first jump is successfully detected.
Sensors & sensor care
Battery
Turning on/off and charging details are in Usage Step 1.
Battery life: about 1 hour on ice.
Charging time: 5 hours from empty to full
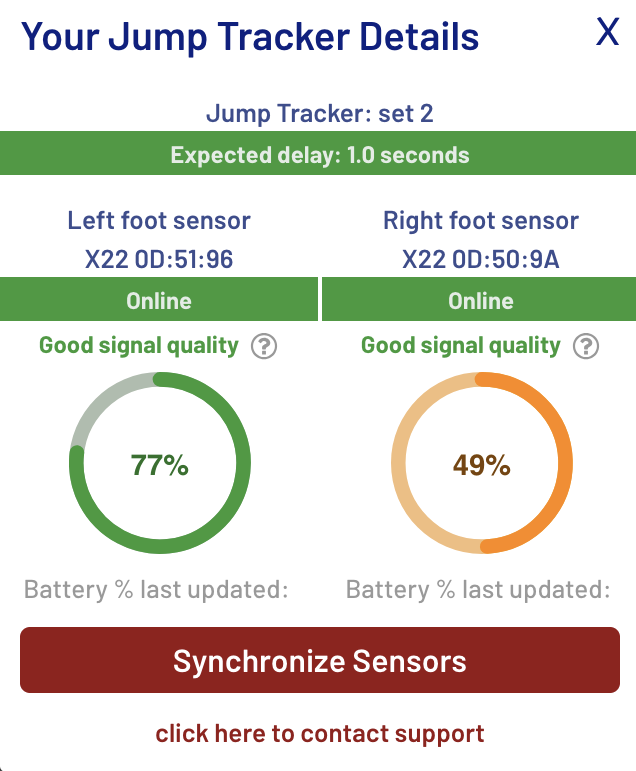
Battery status in the app
- Start a session (coach in the dashboard, skater by clicking Play).
- Click Details.
- The battery level is displayed for both sensors.
What do the different sensor light colors mean?
Connectivity
- ● White (or slightly pink) - No known network in range
- ● Cyan - Known network in range but no internet (or still connecting)
- ● Green blinking - Connected, ready to use
Battery
- ● Red blinking - low battery
- Plugged in:
- ● Blue blinking - charging
- ● Blue solid - fully charged
- Press the button once when the sensor is on to check battery level:
- ● 4 blinks - 75-100% charged
- ● 3 blinks - 50-75% charged
- ● 2 blinks - 25-50% charged
- ● 1 blink - 0-25% charged
Updating
- ● Yellow blinking - this only takes 30 seconds; then the tracker works as normal, so just ignore it and use the sensors as usual.
Configuration mode
- ● Pulsing (any color) — Configuration Mode active
Sensor care
- Store sensors in a dry place.
- Never leave sensors with a fully drained battery for too long.
Strap care
- Check strap closure and positioning regularly before use.
- Keep straps clean and dry after sessions.
- You can wash the straps when needed.
Remember: take the sensors out of the straps before washing.
Connectivity
Connect sensors to mobile hotspot
Follow Usage Step 2 to configure hotspot connection.
How does Jump Tracker connectivity work?
Jump Tracker sends data through your phone hotspot to our cloud for processing. Detected jumps are then securely sent back to your web app.
How to know if connectivity is good in the app?
- Sensors show Online status.
- Data appears with low delay during session.
- Signal quality indicators remain stable.
What if connectivity is bad or delay is long?
- Move the hotspot phone closer to the rinkside area used by skaters.
- Confirm hotspot is in compatibility mode / 2.4GHz support.
- Restart hotspot, restart sensors
Still having issues? Contact us: +41 79 411 68 03 (WhatsApp) or support@aiving.ch.